Router Port Settings for Linksys Routers
Have you noticed that ever since you got your router; be it wireless or wired, you P2P speed is always low? And you p2p applications like eMule complains about you getting lowID and asks you to check your network configuration? Or is Azureus always displaying NAT problem and DHT:Firewalled as well as all the smileys in yellow colors?
Well Good news!. If you're using a Linksys router, the following will help. If you're not on a linksys router, the settings to adjust is almost the same. Its just that different manufacturer have different steps taken to solve the issue. If you're not sure on how you can always google the answer out like "D-Link Port settings" or whatever brand router it is you have.
So you may ask. What causes this problem? What's in the router that's screws up my p2p speeds? Well the answer is that the newer routers have some built in firewall which manages the connection. It basically blocks any incoming ports that you do not earlier has an outgoing connection on that ports.
That makes it difficult for p2p cause the outgoing connection you do is to connect to the Server/Tracker and then from there the users connect to you. Therefore with this settings, the only connection you'll get is the ones which your p2p application finds and not the clients find you. Therefore, this will reduce the number of connection you'll have thus also reducing the speed incredibly.
Thankfully, there are solutions to it. For a linksys router, there are 3 ways to solve it but only one can be used at a time. They are:
- Port Forwarding
- Port Triggering
- DMZ
Port Forwarding
The port forwarding method is basically telling the router to forward the ports to the designated computer instead of blocking them. So to enable Port forwarding:
- Log into your router (default is: http://192.168.1.1)
- Click on Applications and Gaming
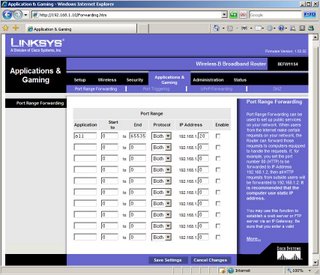
Under Port Range Forwarding as seen on the image above we just enter the application name. For me I put "all" cause I will open all ports for all applications. Then, Under Start To, put 0 and end put 65535 which is the last port in a connection. Select Both for protocol and for the IP Address, put the IP which you're on.

You can check your IP by clicking Start -> Run -> Type "cmd".
And in that console, type "ipconfig"
Look under IP Address, remember that value and put it back at the port forwarding page. Once done, click enable and then click save settings. Voila! Its done.
Note: Your IP changes depends on who switches on the PC first unless you have set it to manually obtain that IP fixed. Cause on default, it will give the first IP to the first computer that connects to the router. So PC#1 may have 192.168.1.10 and you PC may have 192.168.1.11. If you have set your Port Forwarding to point to 192.168.1.10, you won't get the open ports.
Port Triggering
Port Triggering solves the problem of changing the IP every time if you're not on that IP. This is quite similar to the Port Forwarding except that it doesn't specify the IP it forwards to. It will automatically forward the ports all to the first guy who connects to the router. So if you're using this setting, you'll have to always be the first to connect to the router. That means that if you want to use p2p, you'll have to off the router, remove all the cables, plug in yours then turn on the router getting the first IP then plug the others back on.
Here is a screenshot showing the settings.
DMZ
DMZ works by automatically forwarding all ports to a designated IP. It simplifies the previous 2 steps. Simply enter the IP and click enable and Save Settings and then you're done.
Here is a screenshot showing how it looks like


